Having been searching for such a long time, find your favorite video online at last, what your happiness is! If can possess it so that you can watch it everywhere at any time, how perfect it is! However, it's a pity that many SWF files only work well on websites for the reason of some technologies. Well, choose Moyea SWF to Video Pro, only with three steps, all SWF files online can be converted to video without referring technology obstacle. And your fancy will come true at once…
Note: Moyea SWF to Video Converter Pro can convert SWF to video in batch mode and single mode. Here,we strongly recommend you to convert online SWF file with "Manual Conversion Mode" in single mode. As many SWF files online like YouTube videos just have 1 frame but contain embedded FLV files, if such SWF file to be converted in batch mode, there will be only 1 frame but no FLV file can be converted.
Step1: Download Moyea SWF to Video Converter Standard software on http://www.flash-video-mx.com/swf_to_avi_std/, install and launch it.
Step2: Input source a SWF file.
1. Input a SWF File from Youtube
Open http://www.youtube.com, select a video you want to convert, and find the embed box as bellow:
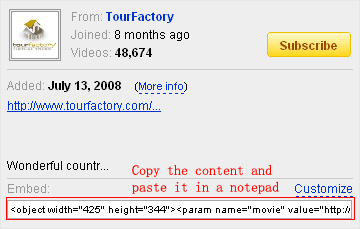
Copy the content in the box and paste it in a notepad, the value or the embed SRC value is the SWF file's URL.

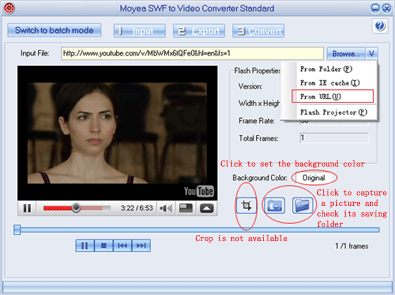
Click "V" behind" Browse…" tab, a drop list will cascade automatically. There are four choices: From Folder, From IE cache, From URL and Flash Projector, we choose "From URL" here, a dialogue bar below will pop up, input the SWF files' URL and click "OK".

After inputting, the properties of input source file are on the right of pane.
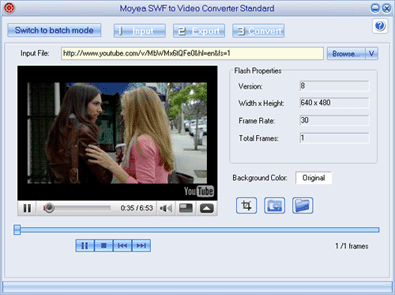
Note: ① On opening the window, you will get "Single Mode" conversion, if you have many files to convert, it is recommended to choose "Switch to batch mode" on the top left.
② The SWF from URL would be greatly influenced by internet speed. So if it can't be watched smoothly online, it is strongly recommended to convert after a fully played.
2. Capture Pictures
Click "Original" in Background Color box, there will pop up a pigment pane, you can select one color or just DIY a color for your video background.
Click "Camera" tab to capture pictures of the playing flash, and captured image files will be saved as JPEG format files.
Click "folder" to check for its saving folder. You can click the button continuously for pictures, and check them together.
Step3: Output file settings. Click "Export" tab in menu, and you will get the following windows.
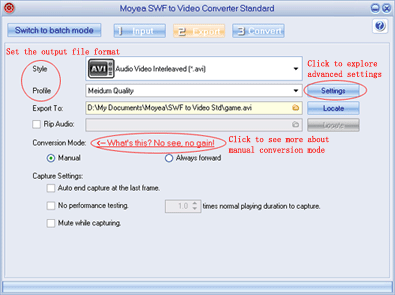
① Set the output file format: Select the output file's style and profile from the respective drop-down list, you can set the output file format. Moreover, you can click" Settings" to explore advanced profile settings, then the window below will pop up:
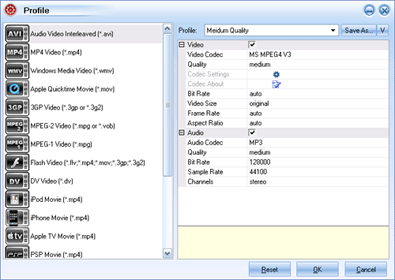
Firstly, select the video style from the left frame, then select the profile from the drop-down list, click "Save as" immediately to save the profile you set as a new one. Click "V", you can save, rename, or delete the newly set. Change the video and audio parameters by clicking each item and selecting the value.
② Set the export destination folder: Click the folder in the "Export to" box to set the output destination folder, and click the "Locate" button, the destination folder will pop up immediately.
③ Rip the audio: Check the "Rip Audio" box, and the audio will be extracted and generated as a single file. Click the "folder" on the right to browse for the audio destination folder, and click the "Locate" button, the destination folder will pop up itself.
④ Select conversion mode: There are two conversion modes: Manual or Always forward. Select "Manual", you can interact in the conversion process by setting the capture start and end points. Click" What's this, No see, no gain!", a window will pop up giving you more information about manual conversion mode. Select "Always forward", you can't interact in the conversion process, and the program always captures forward the SWF file, it is helpful for Flash Game which interacts with people.
⑤ Capture settings: Check to" Auto end capture at the last frame", the program will stop capturing at the last frame automatically, this is available automatically when you have chosen "Always forward" conversion mode.
Check to "No performance testing", the" times normal playing duration to capture" for set the screen capturing speed is available. Set the speed, or just keep the default 1.0. If you change the default value, "Mute while capturing" will be available automatically.
Check to "Mute while capturing", it will be silent when capturing.
Step4: Conversion. Click "Convert" tab in menu, there will be an interface for your converting. On the interface, there will be several buttons: Option, Play and Capture, Play movie, Start Capture, Snapshot, Finish.
Because the SWF file from URL would be greatly influenced by internet speed, it is strongly recommended to fully play the movieonce before capturing. Click" Play Movie" button, you will get the window below:
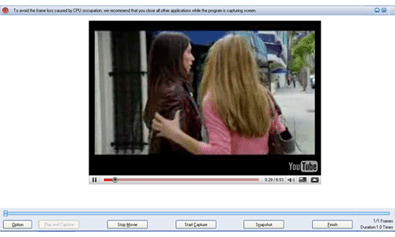
Option: Hit on option" button, there are two choices: Performance testing and Stopped frame.
① Click "Performance testing", interface below for you to set the working folder will pop up. Set the working folder or just keep the default. To guarantee an accurate result, you are suggested to interact with the flash when it asks you to.
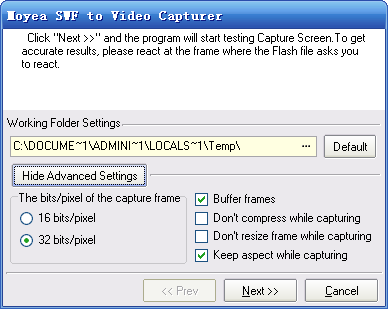
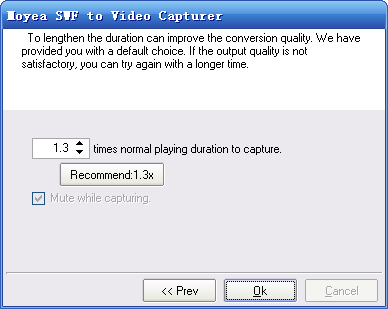
Click" Next>>", a bar showing the progress of performance testing appears. After the performance testing finished, the interface below for you to set the screen capturing speed pops up. Set the speed, or just keep the default. Check the "Mute while capture" box for silent capture. Click" OK" to finish the testing.
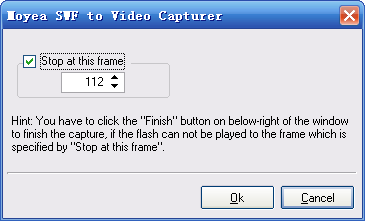
② Click " Stopped frame", the interface below will pop up. Check to" Stop at this frame" and set the frame, then program will stop capturing at this frame.
Play and Capture: Click this button, the SWF file will be played. Meanwhile, the program captures the file.
Play Movie: Click this button, the SWF file will be played while not being captured.
Start Capture: This button is available when there is SWF file being played. If you want to convert part of the SWF file, you can click this button when it comes to the specified part.
Snapshot: Click this button, you can capture the specific picture.
Finish: Click this button to stop your capturing. After finishing capture, the program starts encoding process.
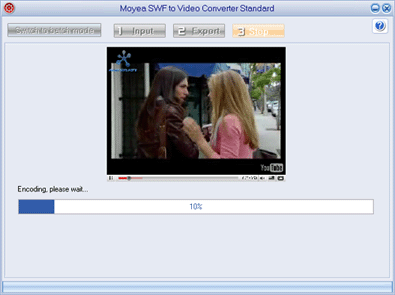
After a while, the conversion will complete. Confirm the "Conversion Completed" and the output folder will pop up automatically.