Do you want to rip DVD or even convert them to other popular formats? If so, you can refer to DVD Ripper.
DVD Ripper can rip DVD and convert DVD to video. It can also add 3D effects to the converted videos. In this tutorial, we will show you how to rip and convert DVD.
Step 1: Download DVD Ripper, install and launch it.Step 2: Input DVD file. DVD Ripper can help you to capture pictures and set the profile of the output videos. This part contains three steps:
1. Input DVD from local computer.
There are two ways for you to input DVD from local computer. You can click ![]() to input DVD or you can click "File" in the menu bar and choose "Load DVD".
to input DVD or you can click "File" in the menu bar and choose "Load DVD".
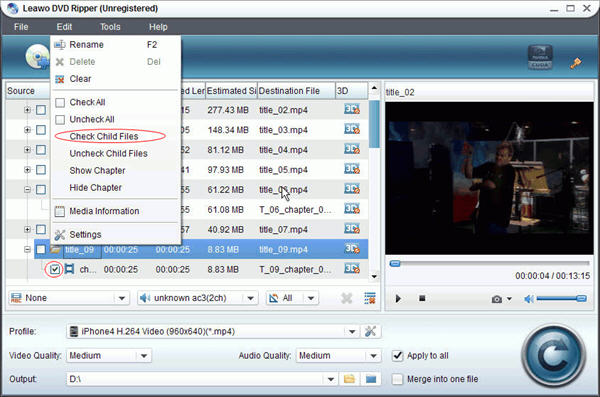
After inputting, you need to check the DVD chapters you want. You can choose two methods to check the chapters. You can check the boxs before the chapters or you can click the parent files and select "Check Child Files" option in the drop-down menu of "Edit".

2. Capture Pictures
In the right part of the interface, you can see a player, in which you can play the chapter you have selected. The player contains a camera icon lying next to the volume bar.
By clicking the icon you can manage snapshotting. The pictures you shot are in png format by default. However, you can change them to bmp or jpg images.
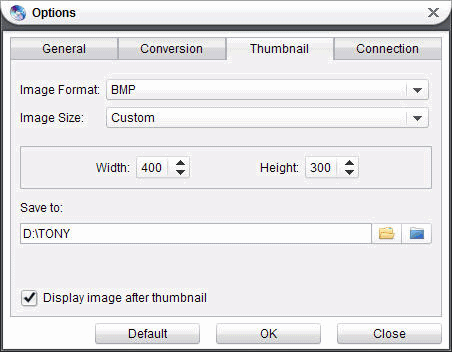
Click "Tools" in the menu bar, select "Options" and then choose "Thumbnail" tab. Here you can select the format of the images in the drop-down menu of "Image Format". You can also customize the image sizes with "Custom" option in the drop-down menu of "Image Size".

3. Set output file
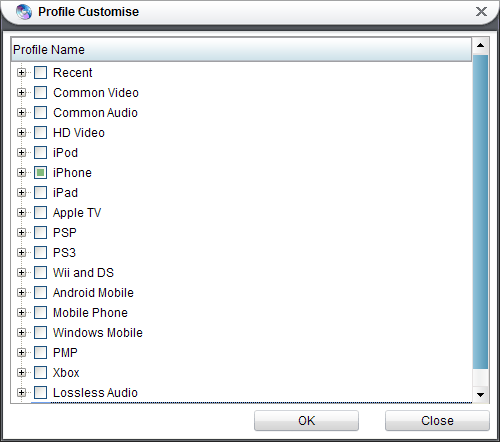
① Set output file format. You can set output file format in the drop-down menu of "Profile".

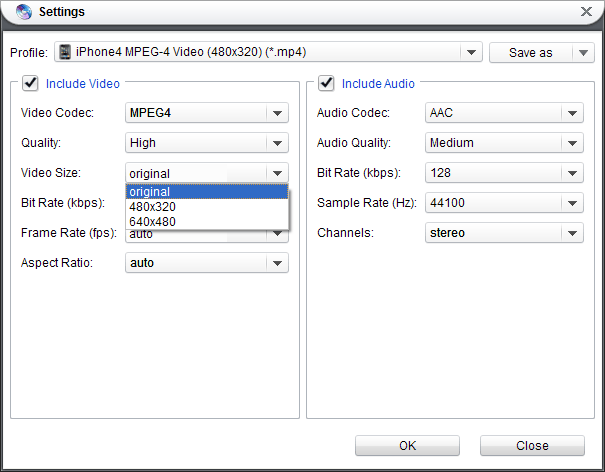
② Set video size and video quality. If the DVD supports multi-language and the subtitle can be more than one language. You can select the subtitle language from "a". You can select the audio language from "b", view the output file with "d" or change the location of output file with "e". With "c", you can set video size and video quality.

Step 3: Edit output video. Since DVD Ripper can provide you functions including "Trim", "Crop", "Effect" and "Watermark", this part contains four steps. There are two ways to help you get to "Video Edit" interface: you can right click the video and choose "Media Edit" option or you can click the edit icon under the menu bar.
Before get starting, I will introduce you some buttons in the interface. Look at the following picture.
 to set start time and
  to set end time.
  can help you to preview the converted file.
  and
and  can help you to flip video horizontally and vertically.
  and
and  can help you to rotate video.
  is a reset button.
1. Trim the video
There are two ways for you to trim the video. You can set the start time by clicking  or by changing the value in "Start Time" box. Then set the end time by clicking
  or by changing the value in "End Time" box.
2. Crop the video
Click "Crop" tab. There are three options for selection in the drop-down menu of "Zoom" including "Letter Box", "Full Screen" and "Pan& Scan". Choose the effect you want. You can crop the video by changing the values in "Left" box, "Top" box and "Cropped Size" box or you can just crop the size with cursor.
3. Edit effect for the video
Click "Effect" tab. You can adjust brightness, contrast, saturation or volume of the video by dragging the corresponding bars in the interface.
3. Add watermark to the video
Click "Watermark" and check "Enable Watermark". You can add image watermark or text watermark. You can fix the size of the watermark with "Image Size", locate the watermark with "Left Margin" bar and "Right Margin" bar or decide the transparent degree of the watermark with "Transpancy" bar.
After all those steps, you just need to click the conversion button and wait for the completion of the conversion. However, if you want to add 3D effects to your video, you need an extra step before clicking conversion button.
How to add 3D effect to the video with DVD Ripper?
Click 3D icon below the menu bar. Then you can see the interface of "3D Settings Beta". You can select 3D effects in the drop-down menu, and change the value of "3D Depth" by dragging the bar. You can preview the effect of the video in the player while you are adjusting the depth.
With the instructions above, you can not only rip and convert DVD, but also attach 3D effects to your video. With DVD Ripper, you can easily enjoy 3D movies with your portable devices like iPhone, iPad, iPod, etc.